Sunday, July 22, 2018

Using the midi tuning specification (MTS) standard in supercollider

Problem?


I have a hardware synthesizer Dave Smith Instruments Rev2 ( (aka DSI Rev2)with support for MTS (=midi tuning specification) and I'm intrigued by its possibilities. How can I reprogram my synth's frequencies from supercollider? In a next post I may or may not (depending on how fast I can solve some annoying bugs :) ) explain how to download scala tunings and keyboard mappings with the Rev2 from supercollider, but for now let's concentrate on the low-level MTS messages. Most of the information in the article explain calculations, so it should also be usable for anyone trying to use MTS from any programming language.

Approach?

It will be explained how to assign random frequencies to all midi notes by composing a valid sysex message containing bulk tuning information. The explanation is somewhat math heavy, but every step is completely detailed which should help you implement something in your favorite programming language.

MTS?

Midi tuning specification is a protocol that allows users of synthesizers to assign any frequency to any midi note. You can reverse your keyboard if you like, or you can assign random frequencies to all keys, or you can explore the wonderful world of microtonality and xenharmonics. The way to assign any frequency to any midi note is by sending midi sysex messages.

Sysex?

Sysex is a hook in the midi protocol that allows for sending anything over midi. "Anything" is to be interpreted as follows: "anything that fullfills the demands made on bytes sent over MIDI, i.e. the highest bit is always 0". This constraint means that in some cases data has to be encoded in a form that is suitable to be sent over midi, and this is also the case for MTS messages. We'll go over the calculations in excruciating detail in the rest of the article.

With some exceptions, sysex messages are not standardized. Any manufacturer can implement its own sysex messages. DSI, e.g. uses sysex to perform OS updates on their instruments. Such sysex messages typically are not publicly documented.

The sysex messages used for sending tuning information, on the other  hand, are standardized. They come in a few flavors. There's a message to request an synth to send over its tuning to a computer, but the DSI instruments appear not to respond to those messages, so I guess they are not supported.  There's another message to send tuning information from the computer to a synth, and that works well. Still other messages exist to retune a few notes in real-time, but I haven't tried those yet.

MTS message structure

MTS message structure is not very complicated, but it takes a bit of explanation. The full explanation can be read in the midi tuning standard spec, but it might contain some mistakes (currently under investigation).

First of all let's explain the general message layout. 

F0 F7 7E 7F 08 01 IDX C1 C2 .. C16 TA1_0 TA2_0 TA3_0 .. TA1_127 TA2_127 TA3_127 CS F7
  • F0 F7 appears at the start of any sysex message
  • 7E specifies that it's a non-real-time message.
  • 08 specifies that we're about to send tuning information
  • 01 specifies that we're about to send a bulk request, i.e. tuning information for all midi notes
  • IDX specifies a 0-based tuning index, this corresponds to the tuning index selected in DSI's global parameters menu, alternative tunings menu entry
  • C1 .. C16 are 7-bit ascii codes for the characters in the name of the custom tuning
  • TA1_0 TA2_0 TA3_0...TA1_127 TA2_127 TA3_127 are the actual tuning information. Tuning information for each midi note is described using three bytes, to be explained below.
  • CS is a checksum, also explained below
  • F7 signals the end of the sysex message

TA bytes tuning information structure

How do the three bytes TA1, TA2, TA3 encode tuning information for a midi note? Well, the first of the three bytes, TA1 is a number that says which lower midi note number is closest to the desired frequency, if the instrument would be tuned in 12-Tone equal temperament (i.e. freq  =  2(midinote-69)/12*440 Hz or vice versa midinote  =  12*log2(freq/440 Hz)) + 69, where midinote is a number 0-127, and freq is a float.

The bytes TA2 and TA3 then encode the difference in "cents" between the frequency indicated by the midi note number in TA1 and the desired frequency. The difference in cents between two frequencies f1 and f2 can be calculated as nc  =  1200*log2(f2/f1)), but supercollider provides some built-in functions to hide these formulas.

In the MTS message, 128 such triples TA1,TA2,TA3 are sent, one for each midi note. 

So if you wanted to retune the 50th midi note to the value of 670 Hz, you'd have to put as 50th triplet in the message the following bytes:

  • the closest, lower midi number corresponding to 670 would be 76 (midi note 76, on a 12-TET tuned instrument, corresponds to a frequency of  2(76-69)/12*440 = 659.26 Hz ). The way to calculate this 76 is by taking the floor of the formula that transforms frequency to midi note number: floor(12*log2(670/440 Hz) + 69) = 76. In hexadecimal, 76 is 4C. 
TA1_50 = 76 (or hex: 0x4C)
  • the difference in cents between 659.26Hz and 670Hz would then be 1200*log2(670/659.26) = 27.98908618457 cents. This difference in cents will always be < 100, because the reference frequency is the closest lower midi note (and the difference between two successive midi notes in 12 TET, is always exactly 100 cents).
  • We have 2 bytes TA2 and TA3 to encode this number 27.98908618457. Because in midi bytes, the high bit is reserved to indicate commands instead of data, that gives us a total of 14 bits (= 0 to 2^14-1) to encode a number in the interval [0, 100] (I include 100 because the difference in cents might e.g. be 99.995). In other words, you get a resolution of 100 cents / (2^14) = 0.0061 cents. That is what we call super high precision :) 
  • If you map number 27.98908618457 from the interval [0,100] to the interval [0, (2^14-1)], by means of the formula 27.98908618457 * (2^14-1)/100 ,you get 4585.4519896181, or after rounding 4585. This 4585 is the number that must be encoded in TA2 and TA3. This happens with bit masking operations:
TA2_50 = 4585 >> 7 = 35 (or hex: 0x23)
TA3_50 = 4585 & 127 = 105 (or hex: 0x69)

Checksum calculation

  • The checksum is calculated as a XOR between all the bytes in the message, except for the sysex header (F0 F7), the checksum itself (obviously) and the end of sysex byte at the end (7F).
  • Gotcha: at the end of the checksum calculation, be sure to "and" the result with 127 (=0x7F) to mask out the highest bit, otherwise you end up with an invalid MIDI message. This is not explicitly mentioned in the MTS standard, but it's implicitly assumed for all MIDI data bytes.

Gotchas

  • Beware of limited precision of floating point operations. In some cases, it may lead to unexpected results and invalid sysex messages as a result. I encountered such problems in my supercollider implementation of the tuning message and put in a workaround.
  • Be sure to check and double check that midi note numbers used as TA1 do not become negative or >127. Failing to do so will cause you hours of debugging (I should know by now!) to find out why sometimes - seemingly out of the blue - the synthesizer does unexpected and weird things when sending a new tuning (like randomly switching to a different program and changing some LFO settings) or why sending a new tuning doesn't seem to have any effect.
  • The MIDI MTS spec states that sending a tuning value with TA1, TA2, TA3 = 0x7F 0x7F 0x7F should be interpreted by the synth as "do not change tuning", but it seems that DSI instruments interpret it as "tune to the highest possible frequency" instead. For this reason the code currently just puts the standard note where no note should be present.

Supercollider code

Note that the following screenshot is part of a supercollider class, part of a larger system to communicate with the DSI prophet rev2 hardware synthesizer (the code can be found here: https://github.com/shimpe/sc-prophet-rev2 ), so you'd have to change some minor syntax details to get it working as a regular function (click the image to enlarge, or - even better - copy paste it from github (which may have a more recent version): https://github.com/shimpe/sc-prophet-rev2/blob/master/Classes/ScalaCalculator.sc).


Friday, May 11, 2018

Panola: a supercollider PAttern NOtation LAnguage

Problem?

In supercollider, one of the best ways to schedule notes over time is by using the pattern system. The pattern system is very flexible but the flexibility can make it a bit hard to use. 

In a typical pattern specification, also known as a Pbind, every dimension to your sound event is independent from every other event. This is just a fancy way of saying that you need to specify volume separately from duration, separately from midinote, etc.

If you want to delete a note in the middle of your piece, you have to dig through all these keys in the pattern specification to find the right stuff to remove or add so as to make sure that all the rest still sounds as intended.

Solution?

By grouping all musical information together and extracting the required keys from that central specification, we can change information in one place and keep all the resulting keys in sync automatically.

Thinking about this, I thought back of a creation I made last year: the midi specification language (MISPEL, see https://github.com/shimpe/expremigen ). I dreamed about having this system available in supercollider. I didn't quite get there yet, but now at least a subset of Mispel is available in supercollider and that subset is known as Panola (pattern notation language), available from https://github.com/shimpe/panola 

Tutorial?

(For now this is a literal copy of the tutorial on http://sccode.org/1-5aq - feel free to go there, it has syntax coloring :) )

// Panola is a way to extract Pbind keys from a concise specification.
// This makes it easier to compose "traditional" music with Pbind, with a lot less
// headache trying to keep the different keys in sync
// It's the type of system I've missed since my day one with supercollider.

// First things first. To install Panola:

Quarks.install("https://github.com/shimpe/panola");

// Now you can get the help document by typing ctrl+D with the cursor on the word
// Panola in the next line

Panola.new("a4");

// Let's start with the "Hello world" of Panola: a simple scale.
// The numbers indicate octaves.
// You don't need to repeat octave numbers if they don't change between notes.
(
~ex = Panola.new("c4 d e f g a b c5");
~player = ~ex.asPbind.play;
)

// asPbind takes a synth name as parameter (which defaults to \default).
// So the above is equivalent to
(
~ex = Panola.new("c4 d e f g a b c5");
~player = ~ex.asPbind(\default).play;
)

// instead of calling a single "asPbind" you can also extract all information separately
// like this you have optimal flexibility in what you want to use from Panola
(
~ex = Panola.new("c4 d e f g a b c5");
~pat = Pbind(\instrument, \default, \midinote, ~ex.midinotePattern, \dur, ~ex.durationPattern, \amp, ~ex.volumePattern, \tempo, ~ex.tempoPattern, \lag, ~ex.lagPattern, \legato, ~ex.pdurPattern);
~player = ~pat.play;
)

// You can make chords using angular brackets. Only note properties of the first
// note in the chord (other than octave number and note modifier (see later)) are
// taken into account.
(
~ex = Panola.new("<c4 e> <e g> <c e g c5>");
~player = ~ex.asPbind.play;
)

// You can use modifiers on the notes:
// # for sharp, x for double sharp, - for moll, -- for double mol
(
~ex = Panola.new("c4 d- e f# gx a# b-- c5");
~player = ~ex.asPbind.play;
)


// With underscores you can indicate rhythm.
// The last used rhythm value is reused until a new one is specified:
// Here's four quarter notes (_4) followed by four eighth notes (_8).
(
~ex = Panola.new("c4_4 d e f g_8 a b c5");
~player = ~ex.asPbind.play;
)

// You can use one or more dots to extend the length of the rhythm, as in traditional notation.
(
~ex = Panola.new("c4_4. d_8 e_4 f g_16 a_4.. b_4 c5");
~player = ~ex.asPbind.play;
)

// You can also use multipliers and/or dividers to change the length.
// E.g. here we use it to create a note that lasts for three eighths
// (c4_8*3) and to create tuplets (e_8*2/3 f g). Remember that last
// duration/rhythm indication is reused until a new one is specified.
(
~ex = Panola.new("c4_8*3 d_8 e_8*2/3 f g f_16 e f e g_4 b_4 c5");
~player = ~ex.asPbind.play;
)

// Now we come to the animated property system. We can attach properties to the notes and animate them over time.
// For now two types of animation are supported: linear interpolation and fixed value.
// To indicate linear interpolation, use curly brackets {}. E.g. here we let the tempo gradually increase from 80 bpm to 160 bpm:
(
~ex = Panola.new("c4\\tempo{80} d e f g a b c5\\tempo{160}");
~player = ~ex.asPbind.play;
)

// Different properties can be combined. Here we let the volume go up until the middle of the phrase, then let it go down again,
// while tempo is rising from 80 bpm to 160 bpm.

(
~ex = Panola.new("c4\\tempo{80}\\vol{0.2} d e f g\\vol{0.9} a b c5\\tempo{160}\\vol{0.2}");
~player = ~ex.asPbind.play;
)

// If you want to use the fixed values, use square brackets instead. You can switch between fixed and animated everytime
// you specify a new property value. In the next example, tempo remains at 80 bpm until we come to note a. At that point,
// it jumps to value 100 bpm and gradually increases to 200.
(
~ex = Panola.new("c4\\tempo[80] d e f g a\\tempo{100} b c5 d e f g a b c6\\tempo{200}");
~player = ~ex.asPbind.play;
)

// Using pdur (think: played duration), we can indicate the difference between staccato and legato.
// Here we slowly evolve from very staccato to very legato:
(
~ex = Panola.new("c4_8\\pdur{0.1} d e f g a b c5 d e f g a b c6\\pdur{1}");
~player = ~ex.asPbind.play;
)

// Using lag we can modulate lag. This can be a way of creating a rubato feeling.
// Linear interpolation is not ideal for this purpose, but it's better than nothing at the moment.

(
~ex = Panola.new("a5_8\\tempo[120]\\lag{0} b c6 a5 e d c5 d e c a4 g#4\\lag{0.5} "
"a4_8 b c5 a4 e d c4 d e c a3 g#3 a b c4 d e g# a_2\\lag{0}");
~player = ~ex.asPbind.play;
)

// In addition to using predefined properties like tempo and lag, you can also use user
// defined properties, e.g. here we animate a property called "myprop".
(
~phrase = Panola.new("c d\\myprop{0.1} e f g a\\myprop{0.6}");
~pattern = ~phrase.customPropertyPattern("myprop"); // extract only myprop values as a pattern
~stream = ~pattern.asStream;
10.do({
| i |
~stream.next.postln;
});
)
// make a pbind in which the myprop appears as one of the keys, with a default value of 0 for myprop
(
~pbind = ~phrase.asPbind(\default);
~stream = ~pbind.patternpairs[13].asStream;
10.do({
| i |
~stream.next.postln;
});
)
// make a pbind in which the myprop appears as one of the keys, with a customized default value of 0.4 for myprop
// (such default values are used if no values for myprop are specified yet, e.g. in the beginning of a Panola string,
//  before any myprop is defined).
(
~pbind = ~phrase.asPbind(\default, custom_property_defaults:Dictionary.newFrom(["myprop", 0.4]));
~stream = ~pbind.patternpairs[13].asStream;
10.do({
| i |
~stream.next.postln;
});
)
// make pbind in which only the standard panola keys are included
(
~pbind = ~phrase.asPbind(\default, include_custom_properties:false);
~pbind.patternpairs.postln;
)

// These custom properties can be e.g. used to drive synth arguments
// The 303 synth used below is reused from https://sccode.org/1-4Wy
// which in turn is based on code from Lance J. Putnam
(
s.waitForBoot({
var line;

SynthDef (\sc303 , {  arg  out=0, freq=440, wave=0, ctf=100, res=0.2,
sus=0, dec=1.0, env=1000, gate=1, vol=0.1;
var  filEnv, volEnv, waves;
volEnv =  EnvGen .ar( Env .new([10e-10, 1, 1, 10e-10], [0.01, sus, dec],  'exp' ), gate, doneAction:2);
filEnv =  EnvGen .ar( Env .new([10e-10, 1, 10e-10], [0.01, dec],  'exp' ), gate);
waves = [ Saw .ar(freq, volEnv),  Pulse .ar(freq, 0.5, volEnv)];
Out .ar(out,  RLPF .ar(  Select .ar(wave, waves), ctf + (filEnv * env), res).dup * vol);
}).add;

s.sync;

line = Panola.new(
"a2_16\\wave[0]\\vol{0.05}\\tempo{120}\\res{0.2}\\sus{0}\\env{1000}\\ctf{100} a a a1 a2 a a3 a2 a a a1 a2 a3 a2 b- g\\res{0.05}"
"a2_16\\wave[0] a a a1 a2 a a3\\sus{0.2} a2 a\\ctf{3000} a a1 a2 a3 a2 b- g\\res{0.2}"
"a2_16\\wave[0] a a a1 a2 a a3 a2 a a a1 a2 a3 a2 b- g\\res{0.01}\\sus{0}\\env{10000}\\ctf{10}"
);
~player = line.asPbind(\sc303).play;
});
)

Saturday, January 13, 2018

Baking sound in supercollider

Problem?

I want to synthesize gorgeous pad sounds in supercollider. This is possible using additive and/or subtractive synthesis, but it takes a lot of CPU power.

Approach

't Is the season to be bakin' fa-la-la-la-laaaaa la-la-la-laaaaa. How about we pre-render the sound into a wavetable and then loop the generated wave table? This moves most of the work to startup time. In the blender 3d program, pre-rendering heavy calculations is known as "baking".

But... won't we lose real-tome creative possibilities then? After all, you cannot modify the partials in a prerendered wavetable anymore?

Well... yes, you will lose some creative possibilities, but we can easily reintroduce some by adding amplitude envelopes, filters and filter envelopes and effects like reverb or phasing and flanging.

PadSynth

One of the more exciting pad generation algorithms no doubt is Paul Nasca Octavian's PadSynth algorithm. It is explained in detail here. I will use it to demonstrate the approach.

In essence it takes as input a basic sound, specified as a set of partials with associated relative volumes. 

It then enriches that spectrum by replacing each of the partials with a fuzzy region containing smeared out partials. This is the equivalent to adding many slightly detuned copies of the original signal, which is how sounds can start to sound a lot warmer. Since human hearing is less sensitive to small frequency differences for high frequencies than for low frequencies, the spreading of partials is made wider in the higher frequency bands than in the lower frequency bands. PadSynth also sets the phases of each of the detuned copies of the signal to random values which helps in reducing undesired comb filtering effects.

PadSynth in supercollider

Supercollider does not come with an implementation of PadSynth, but it is not too difficult to convert the pseudo-code from the detailed explanation into working code. A post by Donald Craig on the supercollider mailing list provides an excellent starting point.

I modified the algorithm a bit as follows: I calculate two different wavetables per octave over 12 octaves (this is probably a bit overkill - feel free to change it). This is an intensive calculation and takes quite a lot of memory. You can certainly reduce this calculation time and required space by reducing how many octaves you want to use, by reducing the number buffers per octave and by reducing the size of the pregenerated wave table (I generate wavetables of around 5 seconds long each).

While playing, the pitch can be chosen by looping over the generated wave tables with a different speed. By varying the speed on-the-fly one can also implement pitch bending or glissando's. All of this is illustrated in the sample code below, in which I will be using supercollider's excellent pattern system to drive a cello-like PadSynth pad. The code can also be found on sccode.org.

Driving the synth from supercollider patterns

Because the synth loops over one of many pre-generated buffers, we'll have to inform the synth about which buffer to use for a given note. For this reason you'll see some calculations being done in the Pbind and Pmono in the sample code. If you decide to generate less buffers per octave, you will also have to adjust these calculations.

More in detail: the parameter \mynote contains a midi note number. This is the note we will want to hear. From that parameter, another parameter \myreference is calculated. This contains another midi note, namely the closest midi note number that was used as a reference to pre-render a wave table: I generate 2 wavetables per octave and each of these wavetables have a reference midi note number. This information is needed in the synth to determine how fast to loop over the buffer. \referencefreq contains the same information but expressed as a frequency in Hz instead of as a midi note number. Remember that I generated two wavetables per octave, for 8 octaves. The parameter \buffer contains the buffer number to use. The buffer being used is the one that was generated with a reference midi note closest to the desired midi note. This information is needed in the synth to know which buffer to loop over. 

The full code is a bit long to paste into this article, so please head over to sccode.org to get it!
If sccode.org is down, there's still github as a backup :) 

Saturday, August 19, 2017

Audio transitions in supercollider

Problem?

In the domain of images and videos, programs like powerpoint and video editors provide a wide range of "transitions". If you think of powerpoint, e.g., you can switch from one slide to the next directly ("cut"), or you can gradually fade out the first one and fade-in the second one, or you can push in, push out, wipe according to a shape, split, reveal, random bars, shape, uncover, cover, flash, morph, ... too many to name.

In the audio domain, however, the options seem quite limited. I'm only aware of direct cuts and cross-fading as audio effects that are offered by default. Can we think of other audio transitions as well?

Approach

In this blog post I will propose a few other audio transitions, as a proof of concept. The code can be found on http://sccode.org/1-57H.

Setting up supercollider

To illustrate the transitions, let's first create two sounds that we want to transition between.
\sound1 is a sine wave with randomly varying frequency (frequency changes 4x per second).
\sound2 is a sawtooth with varying duty cycle. Both sounds are different enough that we can hear the transitions taking place.

I let the 2 sound producing synths output their audio to audio busses.

Next to the sound producing synths I have a bunch of transition synths that calculate the transition between \sound1 and \sound2 as a kind of audio effect. Each transition synth takes a pos argument. Setting it to -1 corresponds to only listening to \sound1, whereas setting it +1 corresponds to only listening to \sound2. For values between -1 and 1 the transition is taking place.

For demo purposes, the pos argument in the transition synths is ignored and instead driven from a fancy counter made specified by an envelope (Env). This fancy counter ensures that supercollider first plays \sound1 for 5 seconds, then gradually transitions to \sound2  during 5 seconds, then keeps playing \sound2 for 5 seconds, then transitions back to \sound1 during 5 seconds and finally plays \sound1 again for 5 seconds.


Groups are needed to ensure that the transition synths are executed on the server after the sound producing synths. Otherwise we wouldn't get audio output. (After all, it's impossible to fiddle with a sound that isn't calculated yet.). 

In the fork section we will instantiate all effect synths one by one so we can hear all of them in succession. In the first screenshot only the "direct cut" is added. This is a transition that basically does nothing: it just stops the first sound and starts the second one in the place.

Familiar effects

cut

A cut (in audio this is sometimes called a "butt splice") is where you stop one sound and start another sound. This basically means: "no effect". In supercollider this can be implemented by stopping one sound and starting another one. This is already illustrated in the screenshot above.

crossfade or xfade

A crossfade happens when you graduallly lower the volume of one signal while gradually increasing the volume of a second signal. For a while both signals sound simultaneously. This is supported in virtually every digital audio workstation (DAW) in existence. Often one can choose whether to change the volume keeping a "constant gain" (linear curve), "constant power" (square root curve?) or even other types like "exponential" (using logarithmic curves).

In the following screenshot I indicated what was changed to add a new effect. In the next effects I will only show the new effects synths. You can easily update the fork section yourself.


So for cross fading with equal power you could do something more like


Seldom explored effects

Do we have to stop at direct cut and crossfade? Of course not... let's try something else. Note: these techniques may actually be well established, it's just that I've never come across them "in the wild". But then, also not many people use transitions in powerpoint and video editing because if you overdo them, they tend to lower the overall end-user experience.

HPF curtain

In this transition, we increase the filter frequency of a high pass filter (HPF) for the signal that is to disappear, while we decrease the filter frequency of a high pass filter for the signal that is to appear. The implementation of this transition is not perfect as it has some audible artifacts on positions close to -1 and +1. It might help to use a high pass filter with steeper roll-off, or to combine this technique with some amplitude control.

LPF curtain

Very similar to the previous transition, we decrease the cut-off frequency of a low pass filter (LPF) on the signal that must disappear, and crank up the cut-off frequency of a low pass filter on the signal that must appear instead.

Wash out

The sound that is to disappear drowns in reverb whereas he other sound emerges from the reverb.

Pixelate

 The sounds become coarser and then more crisp again. This fragment features some complication involving Select.ar because LFPulse does not behave mathematically correct for duty cycle width=0 and width=1 (it generates audible spikes, which ruin its function as an audio stream selector), so near the duty cycle = 1 and 0, I had to select pure versions of the audio.

Push out

The new sound shifts in from the left side and pushes out the old sound to the right.


Can you think of other transitions?


Saturday, August 12, 2017

Scoring a movie with supercollider, blender, python and osc - part II: keyframing and animation curves

Problem?


In the previous part of this tutorial, I described a way to insert markers on blender's timeline, and to use blender's python scripting abilities to convert these markers into OSC messages which then can be interpreted in supercollider to perform commands (e.g. start and stop patterns or sound effects). This approach works very well for sending discrete commands: things like start this, stop that. If you haven't read that part yet, please go read it as you will need to understand the concepts explained there to follow part II.

In this blog post, I want to show how one can use blender's powerful keyframing system with animation curves to continuously update parameters in supercollider sketches. This technique adds extra possibilities for driving supercollider from blender.

Approach?

In the blender scene, I will add custom properties, and animate those via keyframes and animation curves. I will extend the python script I developed in part I to send the parameter value updates to supercollider.

What is a keyframe?

A keyframe represents the value (the state) of one or more parameters at a moment in time. Suppose you have an X-position of an object in a 3d scene. At time frame=0 you can set X=0 and insert a keyframe on frame=0. At time frame=100, you can set X=10 and insert a new keyframe on frame=100. Now for frames between 0 and 100, the value of x can smoothly vary between 0 and 10, that is, the values of x can be interpolated between the keyframes (you can also ask the system for an abrupt change instead of interpolation). The interpolation can be linear, or can include "easing".

Adding custom properties

Blender is extremely keyframeable. Literally every parameter you see in the UI can be keyframed. Blender is also very extensible: users can add new parameters ("custom properties") in the UI. And those new parameters can be keyframed. 
To add a custom property, first switch to blender's default view


Then, on the right hand side, go to the scene tab, and in the custom properties section, click the Add button.


As we did in part I of the tutorial, we will again use a naming convention for the properties so that our python script knows what to send to supercollider from the property name. The proposed naming convention is that a property named SC_something42 wil be sent to supercollider as osc command /something42 with as argument the property value. We will make the python script so that only changes in values are sent. Values that don't change from one frame to the next will not be resent to supercollider. The intention is to avoid creating an avalanche of useless OSC messages.


After clicking the add button, we can set up our property using the naming convention. Suppose I want to automate a frequency in some synth. A possible custom propertyname could be SC_animfreq. This would trigger sending an OSC message /animfreq to supercollider with the value of animfreq as argument. I've set the default value to 440, and the min and max to 20 and 20000 respectively.


Now on the blender timeline, navigate the playhead to - say - frame number 10 (the easiest way is to type 10 in the current frame edit box), set the value of customproperty animfreq to - say - 220. Hover your mouse cursor over the value 220 of animfreq and press the letter "i" (for "i"nsert keyframe). The edit box with value 220 should change color to indicate that a keyframe has been inserted for the custom property.


Next, move the playhead to - say - frame 100, change the value of the custom property to 880, hover the mouse cursor over the 880 and "i"nsert another keyframe.


Now as you drag the playhead between frames 10 and 100, watch the custom property value box. You should see the number change gradually. This is the linear interpolation that happens between keyframes by default.

If we want to alter this behavior of linear interpolation, we need to switch to the "graph editor". A full explanation of everything that an be done in the graph editor falls outside the scope of this blog post (i.e. you'll need to find some blender tutorials about the graph editor on youtube if you want to dive deeper - let's just say that you can do some funky stuff).


After some zooming in x and y direction you can see the linear interpolation drawn as a curve.


By pressing "T" while hovering the mouse cursor over the graph area you can change the interpolation type. Since we're animating a frequency, it makes sense to set the interpolation type to exponential. Be sure to look for tutorials on F-curve modifiers to see some fancy stuff that is possible with the curves. For the purpose of this tutorial we won't go any deeper.


So far we have added an animated custom property. Now let's tell blender to send it to supercollider in the form of OSC messages. To do so I will extend the python script developed in part I of the tutorial. The additions with respect to part I are marked in the figure.


The OSC messages can be received in supercollider in exactly the same way as in part I. The received values then e.g. can be used to set the freq argument in a synth (or the density in some cloud of sound grains, or whatever you feel like doing).

A blender file and supercollider file with a simple demonstration can be downloaded from google drive.


Scoring a movie with supercollider, blender, python and osc.

Problem?

I want to score a movie with a generative supercollider score (that is, insert supercollider patterns and sound effects, ...). How do I sync the sound to what happens in the video? What if I want to last-minute edit the video? Can I automatically resync parts of my audio to the edited video without having to manually edit start and stop times of patterns and sound effects in my supercollider program? I want a reasonably efficient, a non-intrusive workflow, preferably not requiring gazillions of context switches between different tools, with minimal context switching required, and not requiring a calculator to convert between video frame numbers and milliseconds all the time? I want to be able to scrub through the video (either fast, or frame by frame if needed) to find the correct places for starting and stopping sounds, and trigger the starting and stopping of sounds and patterns directly from the video timeline.

Pretty much all of the above (and much, much more) is possible by leveraging existing mature tools and technologies. And this tutorial will explain one way of doing it. Once you understand how it all works, the new possibilities that are created by coupling these technologies are simply overwhelming. The tutorial is developed on Linux, but I will use only cross-platform tools, so you should be able to replicate it on your own system. (Let me know if you tried and if you succeeded :) )

Approach

I will use the most powerful video editor currently available for Linux: the often underestimated Blender Video Sequence Editor (VSE). Blender is at version 2.78c at the time of writing. Youtube has a series of very good VSE tutorials in case you want to dive deeper later on. Blender is fully scriptable in Python 3 and we will exploit these abilities to trigger OSC commands from markers inserted on the blender timeline (this addresses the minimal context switching, video preview, avoiding manually converting video frame numbers to milliseconds). These OSC commands will be received in supercollider and used to start and stop the sounds and patterns.

If you move videos around on the timeline, blender offers a way for you to choose for each marker whether to either keep it locked to its current position, or whether to move it along with the video fragment. This addresses the resyncing after editing part mentioned in the problem statement.

In supercollider the OSC messages will be received and used e.g. to trigger patterns or sound effects. We will do this in the language side of supercollider. Sending OSC directly to the underlying sound synthesis server is also possible, but for most purposes way too low-level and complex to be practical.

Python scripting will enable us to add some intelligence to the system: e.g. often needed OSC commands (like start pattern, stop pattern, start sound effect, ...) can be encoded in the marker name, whereas less generic commands can easily be handled by editing the python script embedded in Blender. If this sounds still vague, don't worry. We'll come back to it.

Prerequisites


Setting up supercollider

We will not spend too much time on setting up supercollider for now, as our first focus is on driving supercollider from blender's timeline. But we need a minimal supercollider program that can receive OSC messages and react to them - if only to test that blender works as expected.

Here's such an example: whenever an OSC message is received, it prints out the message and its arguments. For now react to only 2 messages: "/stap" (shorthand for "/startPattern") and "/stop" (shorthand for "/stopPattern"). The name of the pattern to be started/stopped will be an argument in the OSC message.


Setting up blender

Start blender, and check in the File -> User Preferences -> File tab that "Auto Run Python Scripts" is enabled. This is a convenience setting so we avoid having to manually start the python script we will develop when opening blender and playing back the video. Note that this is convient, but may present a security risk if you install other blender add-ons that you didn't make yourself, so you may want to reconsider. If you don't enable the setting, you will always have to remember to start the python script manually. I'll show how to do that later.


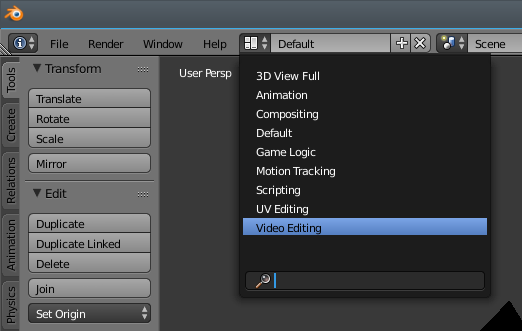
Next, switch to video view in the top menu.


and insert a video on the timeline using the Add menu item just above the timeline.


I've selected a random movie file from archive.org (https://archive.org/details/TheSoilers) and importing it shows two strips: the green strip represents the audio stream, and the blue stream represents the video strip.


Let's remove the audio stream (strictly speaking this is not needed, but it's a silent movie so it just takes screen space). Right mouse click on the green strip to select it, then type the X key to delete it (think "eXtract") and confirm the deletion.


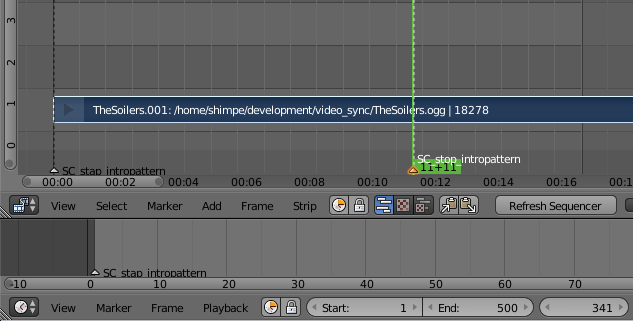
Then position the green bar (the playhead) on frame 1 by dragging it by mouse or by setting number 1 in the current frame edit box. As you drag the green bar over the video strip, you can see the movie play in the preview window. This is called scrubbing. It makes for easy finding frames where to start or stop certain sounds or patterns. Next, in the marker menu, select Add Marker (or faster: hover your mouse cursor over the timeline and press the M key).


A marker appeared with the name F_01 (which is shorthand for Frame_01). To rename the marker, right mouse click it in the timeline to select if not already selected, then press ctrl+M on the keyboard to rename it.


We'll rename it in such a way that the name itself tells us which OSC command to send to supercollider. This is just so we can quickly add commands on the timeline later without having to edit Python code all the time (minimizing context switches!). Let's e.g. rename the marker to SC_stap_intropattern. Here, SC_ means that the marker will be interpreted as pertaining to supercollider, "stap" is shorthand for "STArtPattern", i.e. a command we will send to supercollider in the form of an OSC message, and "intropattern" is the name of a pattern that we will later define in supercollider. It will be sent as an argument in the OSC message.


Next, go to frame 341 (you can easily verify in the preview window that this is the last frame before some new text appears). Also, set the end frame to 500. This ensures that we will only render the first 500 frames of the movie (there's no point in rendering more for this tutorial). If you forget to increase the end frame, it will remain at the default of 250 and playback/rendering in blender will not be able to pass beyond the 250 frame limit.

If you find at this point that the video strip was not put in the timeline at frame 1, you can right click on the strip to select it, then type the "g" key for "grab", then type the "x" key to constrain the movement in x direction, then reposition it with the mouse and left mouse click to confirm the new position. Blender has many efficient ways of working with selections and movements, and you will greatly benefit from doing some blender tutorials to get to know all these useful tricks.


Now insert and rename a marker SC_stop_intropattern as before: mouse cursor over timeline, M, ctrl+M, SC_stop_intropattern, OK. (Notice how fast this goes?)


Done? Great! We've created some fancy markers, but blender of course has no idea yet that these are supposed to trigger OSC messages to be sent to supercollider. We now have invoke the magic of Python scripting to actually make that happen.

Scripting blender with python

If you haven't done so, install python 3.x from www.python.org, and make sure you have the python-osc module installed. Usually installing a module involves opening a terminal window, navigating to the folder where python is installed, find the pip.exe executable and run on the command line:

pip install python-osc

First, switch blender to scripting view on the top menu.


We will add a new python script first. To do so, click the "new" button in the script window.


As soon as you clicked the new button, the menu changes and you can type a name for the script. I chose trigger.py as name. It's important to give a name that ends in .py because that ungrays the register button. Make sure the register button is not grayed and click the checkbox. The effect of "Register" is to run this python script automatically when the .blend file is loaded in the future (but only if you allow automatic running of python scripts in the user preferences). It's just a detail really, but it allows us to work more efficiently in the future.

The black on gray text on top of the screenshot that looks like python code is generated automatically by Blender whenever you click user interface elements. This shows what you would have had to write in python to achieve the same effect as when clicking the user interface elements. You can safely ignore it for this tutorial.


In the gray script area, we can now write down our Python script. The approach I'm going to use is to register a frame_change_pre handler. This is a callback function that is called by Blender whenever the framenumber is increased during playback or dragging the playhead. Note that in order to type into the script area, you need to make sure that the mouse cursor hovers over the gray area. When it hovers over other areas (e.g. timeline), the keyboard keys get other meanings and you may get frustrated quickly :) 

In the callback function we will check if animation is running (we don't want to send OSC when simply scrubbing the timeline) and if there's a marker at the current frame number. If one or more markers are found on the current position, check if it is one of the markers that triggers automatic OSC messages, or if it is a marker that has a manually registered OSC message attached to it. In the example code I used manual registration to react to the markers with name "init" and "cleanup" and "explosion" (lines 19-21). Note that explosion is added for demo purposes only. It'd make much more sense to add an automatic marker for triggering synths in supercollider. Marker names triggering automatic OSC commands can also be manually registered in the manual_markers map. In that case both the automatic and the manually registered version are executed.

Blender allows to insert multiple markers with the exact same name so there's no problem to retrigger the same commands multiple times. (The python code allows to add an optional number suffix (which is ignored for OSC generation), e.g._234, to automatic marker names because not everyone feels comfortable having the exact same marker name in multiple places) Blender also allows adding multiple markers on the exact same location, so also there we do not hit any limitations to what is possible in terms of sending multiple commands. Using manual registration, you can also add multiple OSC messages for a given marker. Manual registration boils down to editing the python script.

Blender pitfalls

  1. Every time you've edited the python script, be sure to press the "run script" button to see the effect. There's a call to bpy.app.handlers.frame_change_pre.clear() to ensure that the same handler is not registered multiple times. If you didn't set up automatic running of python scripts in the user preferences, you need to press this button also after you loaded your .blend file.
  2. The frame_change_pre handler is not executed in frame N if the playhead starts on frame N.
  3. Blender playback stops automatically when the end frame is reached. Make sure you set it high enough in the UI
  4. If you use python scripting, it's best to start blender from the command line as python errors (syntax errors) will be displayed in the terminal from which blender was started
  5. If you try to type/paste into the script area, make sure the mouse cursor is somewhere hovering over the area. Keypresses are interpreted differently when the mouse is outside that area. Similarly, if you try to save your .blend file with ctrl+s key, be sure the mouse cursor is outside the script area (e.g. hover it over the timeline), otherwise blender will try to save the python code only into a file.
  6. If you start to move around video strips, you may want the markers to move along (or in other cases you may want the markers to remain where they are). By default, the markers don't move along with the video, but if you check the "sync markers" checkbox in the video editing layout's view menu, all selected markers will move along when you move a video strip. Selecting markers happens by right mouse click in the timeline (on the marker). You can add more markers to a selection with shift + right mouse click. You can select many markers at once by hovering over the timeline with the mouse, pressing b for "box select" and drawing a rectangle over all the markers you want to select. These are common techniques in blender. If you are serious about working with blender, make sure to learn the basics.

Supercollider pitfalls

  1. If you use Ndef/Pdef/Tdef, you will want to make sure they are quantized to 0, otherwise the sounds may start late and it will ruin the video-frame acccurate timing we're striving for.
  2. If you redefine the guts of Ndef/Pdef/Tdef, also think carefully about the fadeTime. It may be wanted, or it may cause your sound to mess up.
  3. Be careful to free resources you don't need anymore or the sound generation might crash before the rendering is finished.

Intermediate test

In supercollider, start the test program that listens for OSC messages. In a real-life situation you would also want to make sure some DAW is set up for recording the audio generated by supercollider.

In blender, set the current frame to 0. Because of pitfall #2 in the list of Blender pitfalls listed above, since we added a marker on frame 1, we should start playback from frame 0, since otherwise the first OSC message will not be sent. I've found there's no need to also set the start frame to 0 for this: setting the current frame is enough.

When everything's set up click the play button in blender. In Blender, you should see the playhead progress over the timeline, and if you are in video editing mode you should see the video play in the preview window. In the supercollider "Post window" you should see the OSC messages appear as dictated by the markers at frame 1 and frame 341. Playback will automatically stop when the end frame number is reached. Make sure to set the end frame number high enough! (blender pitfall #3)

Performance considerations

Blender allows you to add many video strips and to make complex transitions between video strips. You can also project one or more movies on 3d objects, and even insert and render complete 3D scenes in multiple layers. For truly complex scenes, the actual rendering can take up to several hours per frame. Clearly this does not match with the requirement of sending supercollider commands to generate audio in real-time... Add to that that supercollider may also need considerable CPU power to generate its sounds. Can we somehow solve this!?

Think about it... the only thing that drives supercollider are the inserted markers. And the markers are not tied to a video or scene, they are tied to the timeline. Once all your markers are set up in the right places and with the right names you can remove or mute all video strips and blender 3d scenes (save a backup first!!!) and just let blender run with the empty timeline (that is: empty except for the markers).

The markers will instruct supercollider to generate sound at the right moments in time with negligible CPU usage from Blender, and you can record the resulting sound in a digital audio workstation (e.g. on Linux, ardour is a perfect match since the JACK protocol allows for routing the sound out of supercollider and into ardour directly, and since both Blender and Ardour support the JACK transport protocol,  you can later on also easily mix in music and samples from other sources than supercollider). 

Finally add the recorded audio as an audio strip on top of the original scene/video (here's where you will be happy to have made a backup ;) ) and render the whole to a final movie + sound (at glacial speeds if necessary, but for a simple video like the one we made here on recent enough PCs none of this performance tuning is really necessary. Everything runs happily in real-time.

A working example

Let's turn our supercollider test program into something that actually produces sound. I'll add support for the init, clean and synth commands that are used in the rest of the article as well. I'll leave it up to you to edit the blender time line to trigger some of the newly supported commands, and to add support for new commands as you need to perform your tasks. Be careful about the explosion sound... IT'S LOUD!!!!!

Conclusion

My initial experiments indicate that the approach outlined here works really well for my (admittedly simplistic) purposes, and I'm really excited about the combined powers of blender, python, OSC and supercollider when it comes adding generative sounds and music to a movie. Given the tremendous combined power of these mature technologies I'm sure we're just seeing the beginning of the combined possibilities.

Wednesday, August 9, 2017

Automating squiggles in supercollider part II

Problem?

In part I of this explanation we used mathematics to create beautiful squiggles. While this gives ultimate control over the scribbles (in terms of accuracy and repeatability of the squiggles), sometimes you just want to do something simpler (quick'n dirty) or something more creative (too much work to spell out in math formulas). 

Approach?

You can simply draw a squiggle with the mouse, record it and then use it to drive a synth. You can also further manipulate the recorded data to produce variations of the recorded gestures.

Code?

Recording

Part I is about recording a squiggle. A very simple proof of concept code is given here. Start the code, then draw a squiggle with left mouse button on the canvas. Both positions and timing information is remembered. 

Performing

 Part II is about performing the recorded squiggle. The recorded information is interpreted. Nothing stops you from transforming the recorded data first (e.g. to create mirrored, scaled, skewed, ... or non-linearly transformed versions of the recorded data - this might lead to interesting ways to create new music).

Conclusion

This approach obviously is much simpler than mathematically constructing squiggles, but it doesn't offer the same level of control and precision. It all depends on your needs what method to use! Finally an easy way to bring Picasso's dog to life :)